Pages

Showing posts with label airfryer. Show all posts

Tuesday, January 14, 2014

Paprika chicken wings

I wanted to contribute to a New Year's Party and was flipping through the Airfryer recipe book for some finger food I could bring. In the end, I adapted the recipe for barbecued chicken. It turned out too good not to share. The boyfriend said it was good enough to appear on a restaurant's menu. That made my day. In fact, it was so good that we devoured the thing before I remembered to take a picture. :/

A point of caution though. I found it a little more troublesome to clean the basket as compared to other dishes I've made in the fryer. It gets worse when you substitute sugar with honey. It might be a good idea to line the basket with baking sheet or foil. Just make sure you poke some holes through it to encourage circulation. 

Ingredients
Marinade: 
1 clove of garlic, minced
1/2 tbsp mustard (I used dijonnaise mustard)
2 tsp sugar
1 tsp chilli powder
Dash of freshly ground pepper
1 tsp smoked paprika
1 tbsp olive oil

8 drumlets/winglets or 4 drumsticks

Method
1. Mix all the powders of the marinade. Add garlic and mustard. Stir to combine. Add olive oil. Stir till combined into a thick paste.

2. Rub paste all over the chicken and refrigerate for at least 4 hours. Best overnight. Use a ziplock bag with air pressed out to ensure that the marinade covers the chicken.

3. When ready to cook, remove from refrigerator. Preheat airfryer at 200 degrees Celsius.

4. Air fry chicken at same temperature for about 15 to 20 minutes. Flip midway. 

5. Serve and enjoy!

Matcha Cupcake


I've always been a great fan of Matcha. Matcha Latte is one of my favourite drinks. Having tried several types of flavour of tea in my cupcakes, it was natural to try Matcha cupcakes.
The recipe is the same as the one for Earl Grey Cupcakes, except I replaced the earl grey tea with matcha powder. Here it is again for your reference. This recipe made 15 tiny cupcakes.


Ingredients:
100g butter
95g caster sugar
1.5 small eggs 
82g self-raising flour
Pinch of fine salt
1/4 cup fresh milk
2 drops of vanilla extract (optional)
8-10 teaspoons of matcha powder (best to just eye-ball it. You want a pale but obviously green batter)

Equipment:
Stiff cupcake liners (important that they are the stiff ones if you use the air fryer).
Air fryer / oven
Electronic Beater (unless you are an expert with the whisk)

Method:
1. Leave butter and eggs to thaw to room temperature. The butter should be a little soft to touch (like the fleshy part below your thumb). Cut it up into loose chunks. 
2. Stir the dry ingredients (including the matcha powder) together and set aside.
3. With a beater, cream butter for a while to make it creamy. Cream butter and sugar into a nice pale, yellow, creamy consistency. Add eggs a bit at a time, beating after each addition. Add vanilla essence if using.
4. Mix in dry ingredients alternately with milk, starting with the flour mixture and ending with the flour. I used the mixer on the lowest speed to do this. But if you want to ensure it is very fluffy, fold in with a spatula instead. The mixture should be a nice pouring consistency (but not too watery). 
5. Bake for 20-25 minutes in the Airfryer at 160 degrees Celsius. Use a tooth pick to poke the cupcake in the middle after 10 - 15 minutes to allow the air to "escape" a little as the Airfryer cooks it pretty fast. It should still be wet in the middle at this point. 
6. Cupcakes should be about done when it shrinks from the side a little after 20 minutes. Test with toothpick again. It should come out either clean and dry or with nice crumbs. If the top hasn't brown at this moment, turn up temperature to 180 and bake for another 3-5 minutes. Check regularly to prevent charring it. Note: If you use an oven, the proposed setting and timing is 175 degrees Celsius for 40 minutes.

Friday, February 8, 2013

Homemade Peanut Cookie (Fah San Pang)


I've been on a baking roll (pun unintended) and thought I'll try my hands at some Chinese New Year goodies. These were so good that I abandoned all attempts at photographing them after this shot. I brought some to work as promised and my colleagues were so intrigued and I have inspired a few more to make their own! *beaming with pride*

Peanut cookies were one of my favourites since I was a child. I used to gorge on them so much that I'll fall sick after Chinese New Year. And sometimes, I'll secretly hide one bottle away from the eyes of visiting relatives, much to the chagrin of my parents then.

I used the recipe at Sam Tan's Kitchen but made some adaptation and also noted the amount of oil used. It was easy, fuss free and so yummy. Rope in the little ones in the house with the rolling part and it becomes a family bonding activity!

I cheated on the peanuts by buying ready salted ones; you know, the ones we typically snacked on? But you could always buy unroasted ones and toasting them in the toaster yourself. Either way, they blend well, so no worries there. The advantage of roasting your own is that the cost is way lower. So it's your call.

Here's the recipe!

Ingredients
200g roasted salted peanuts
200g plain flour
100g icing sugar (Caster sugar will not give that fine a texture. Avoid replacing.)
1/2 tsp baking powder
1/4 tsp of salt (more if you used unsalted nuts)
150ml of oil
egg  wash - 1 beaten egg yolk diluted with 1 tsp of water (optional - I skipped these in mine)

Note: Sift your flour, icing sugar, baking powder and salt into a big bowl.

Method
1. Preheat oven at 160 degrees Celsius. Grease baking tin.
2. Blend the peanuts in a chopper till very fine. Almost as powdery as your icing sugar.
3. Add the peanut powder to the flour mixture. Stir to mix well.
4. Pour half the oil into the mixture, and knead into a dough, adding more oil bit by bit if the mixture is too crumbly. Knead until you get a sticky dough. The key is to be able to roll little balls from it without it crumbling. If it's too "wet", just add flour and sugar.
5. Roll into tiny balls and place them on greased baking tray, glaze with egg and press half a peanut into the centre, make sure it is somewhat pressed in. The balls will flatten themselves the rest of the way in the baking, so try not to press down too hard either.
6. Bake at 160 degrees Celsius for 20 - 25 minutes.
7. Cool and store in airtight containers. Try not to finish them before Chinese New Year.

General Tips:
1. Try to avoid getting the dough too wet such that you need to top up on the flour as that changes  the consistency. 
2. For best results, use the unroasted nuts for the piece you press into the balls as these get baked too. Salt them first to get that extra kick you get when using ready ones instead. Best of both worlds.
3. Airfryer users can use the removable base of a cake tin to bakes these. I made mine with airfryer. Same temperature at approximately 15 minutes. Start checking from the 10th minute to make sure they don't burn and remember that they brown a little more even after you take them out (residual heat!).

Happy Snake Year everyone! Wishing everyone good health and prosperity in the year ahead.

Wednesday, January 30, 2013

Earl Grey Cupcake


What can be better than a nice cup of earl grey tea with yummy cupcakes? Earl Grey cupcakes.

I have been wanting to test the Philips Airfryer baking capabilities for a long time but I didn't want bake something and let it go to waste. I finally stumbled upon a great recipe on the Little Teochew

Here's my version of it. Makes about 15.

Ingredients:
190g butter
200g caster sugar
3 small eggs 
165g self-raising flour
1/4 teaspoon fine salt
1/2 cup fresh milk
1/4 teaspoon vanilla extract 

2 teabags of fine earl grey tea (I used Dilmah which is easily found in NTUC.)

Equipment:
Stiff cupcake liners (important that they are the stiff ones if you use the air fryer).
Air fryer / oven
Electronic Beater (unless you are an expert with the whisk)

1. Leave butter and eggs to thaw to room temperature. The butter should be a little soft to touch (like the fleshy part below your thumb). Stir the dry ingredients together and set aside.


2. Warm up milk (do not boil) and steep 1 teabag of Earl Grey tea for about 10 minutes. (Add 1 more if you want it to have a strong Earl Grey fragrance).  Let milk cool to room temperature. (Tip: squeeze the teabags before you remove to get more out of the teabags!)

3. With a beater, cream butter and sugar together. Cream the butter for a few seconds just to break it up. Add sugar a little at a time and cream until totally mixed into a nice creamy mix. Add vanilla essence and eggs. Add eggs one at a time, beating after each addition.

4. Mix in dry ingredients alternately with milk, starting with the flour and ending with the flour. I used the mixer on the lowest speed to do this. But if you want to ensure it is very fluffy, fold in with a spatula instead. The mixture should be a nice pouring consistency (but not too watery). 

5. Fold in the other bag of tea leaves now. Don't "over-mix". (For those who don't like having the tea leaves in the cake itself, you can infuse everything into the milk.)

6. Bake for 20 - 25 minutes in the Airfryer at 160 degrees Celsius. Use a tooth pick to poke the cupcake after 10 - 15 minutes to allow the air to "escape" a little as the Airfryer cooks it quite fast. It should still be wet in the middle at this point. Cupcakes should be about done when it shrinks from the side a little 
after 20 minutes. Test with toothpick again. It should come out either clean and dry or with nice crumbs. If the top hasn't brown at this moment, turn up temperature to 180 and bake for another 3-5 minutes. Check regularly to prevent charring it.

Note: If you use an oven, the proposed setting and timing is 175 degrees Celsius for 40 minutes.


Tip: If you already have silicon cupcake molds (see photo below), you can use the paper liners placed within these to bake in the airfryer. Put the cups and liners in the fryer first before scooping the mixture into the cups. Fill up to slightly more than 2/3 full. (NOT full, as they will expand!)

Sunday, February 26, 2012

Fried Curry Puffs


This recipe makes puffs that are deep fried, like the Old Chang Kee ones. The dough is made of two doughs. My attempt was a little dry and thus I've modified the recipe below a little to make it less dry.

You can replace the shortening with margarine, which was what I did. :)

Makes about 20 pieces

Ingredients:
Outer dough
450g flour
150g shortening
150ml water
1/2 tsp salt

Inner Dough
100g shortening
150g flour

Filling:

6 medium size potatoes
4 eggs
70g curry powder
800 g of chicken meat
1 large red onion
Optional: green peas

Filling Preparation:
1. Boil eggs till cooked. Cool, peel and cut each egg into 6 slivers. Set aside.
2. Boil potatoes until almost cook. Peel and cut into small cubes.
3. Cut chicken into small cubes.
4. Cut the onions into small cubes and roughly chop it up. (Not too fine!)
5. Fry the onions until fragrant and starting to brown. Add the chicken meat. Fry till cooked.
6. Dissolve curry powder in a little water to create a thick paste. Add into the mixture. Fry till well-coated.
7. Add potatoes. Add water if too dry. Fry till well-mixed. Make sure it is not too dry as it will become dryer as it cools.

Dough Preparation:
1. Beat margarine for outer dough until pale white and add in flour slowly. Keep beating until well-integrated.
2. Pour the mixture out on a clean table top or large tray.
3. Mix water and salt together. Create well in the middle of the mixture and add water in, knead the mixture into a dough, folding from outside in. (You may not want to add all the water at once, in case it gets too wet. If you feel it's quite dry, you can add more as you knead it into a dough.)
4. Leave dough in bowl covered with a damp cloth and set aside. The dough texture should rather damp and soft, but still holding together well.
5. Cut the margarine for the inner dough into smaller pieces and mix with flour using the mixer. Once crumbly and well-mixed, knead together into one dough. Put into a bowl and cover with damp cloth.

Making the curry puffs:
1. Roll out the outer dough into a thick square with a border about 1/3 all round that's thinner. Roll out the inner dough to the size of the thick center area of the outer dough. Place in the middle of outer dough. Wrap the outer dough around the inner dough. (Just fold in the sides)
7. Roll out dough to desired crust thickness. If the dough is not well- integrated yet, roll out into a long rectangle, and fold in three, and roll out again.
8. Use your dough cutter to cut out circles for the puff. (I used a medium chinese soup bowl).
9. Spoon filling into the middle of pastry. Put a sliver of egg on top. Fold the sides to meet and then pinch and twist the sides. Alternatively, you can buy the curry puff maker from Sheng Shiong at $1 (see picture below) to help you wrap the puffs.
10. Heat oil and deep fry. Those of you with the air fryer may want to fry it with the air fryer for a healthier treat. Brush some olive oil all round before you pop it into the fryer.

If you tried this recipe, do share how it went and any suggestions you have to improve it! Cheers!

Friday, February 24, 2012

Scotch Eggs (The Simplified Version)


Ingredient List:
4 hard boil eggs

Meat case:
300g chicken meat (preferably a slightly fatter cut - e.g. boneless leg)
4 chicken hotdog sausages
11/2 tbsp flour
1/2 tsp of Black Pepper
2 tbsp BBQ Sauce (better if you have Worcestershire Sauce)

1 cup breadcrumbs

1. Put eggs and tap water (preferably at least 3/4 submerged) in a saucepan and bring to boil. When water boils, turn off the flame and let the eggs cook a little longer (about 5 minutes).
2. While eggs are cooking, mince chicken, sausage and BBQ sauces into a meaty paste. Mix 1 tbsp flour, pepper, and any other herbs you would like to add. Add this mix to the meaty paste and integrate well. Set aside.
3. Drain the water from the eggs and pour in cold water to cool. Peel eggs and set aside.
4. Beat one egg in a separate bowl. On a flat tray, pour out the breadcrumbs. Shake evenly.
5. Roll an egg in remaining flour, dusting off excess. Wrap the minced meat paste around the egg. Repeat for all eggs and set aside.
6. Dip the meat-encased eggs into beaten egg, and roll on tray of breadcrumbs. Shake off excess.
7. Deep fry till golden brown!

Air-Fryer Alternative:
If you own the Philips airfryer and don't mind a little mess in exchange for a healthier version, you can use that. Preheat to 180 and fry for 20 - 25 minutes. Make sure you turn the eggs every 6-8 minutes.

Indulgent Alternative:
Use minced pork instead of chicken and sausage mix.

Monday, February 20, 2012

Fried Five Spice Chicken


Five Spice Asian Chicken
1/2 kg of chicken wings / drumsticks
1 packet of five spice mix (available in most convenient stores) or 3 - 4 tsp of five spice powder
Cornstarch
Wine / Water

1. Wash the chicken parts clean.
2. Mix the chicken with the five spice powder in a zip-lock bag. Add a little wine / water if the powder is too dry to coat the chicken parts evenly. It should not be dripping wet!
3. Leave the chicken to marinate in the fridge for at least 1 hour.
4. Pour cornstarch on a tray or flat plate.
5. Coat chicken with cornstarch all round. Ensure it is well-coated but not too thick. It should not be too powdery.
6. Deep fry!

Alternatives:
Bake version:
1. Put a little bit more water so that the marinate becomes a thick sauce-like consistency.
2. Bake in a lined tray at 180 Celsius.
3. When baking, spoon the extra marinate onto the chicken whenever it gets a little too dry.

Air-fryer version:
1. Ensure that it is NOT wet for the air-fryer version. Everything else remains the same.

Monday, January 30, 2012

Homemade Lor Bak Gou (aka Turnip cake)


Ingredients:

300g glutinous flour
1-2 tsp cornstarch (optional)
2 cups stock (See instructions below)
1 kg radish
4 dried mushrooms (soak to soften then roughly chopped)
1/4 cup dried shrimps (soaked in warm water to soften, use water to make stock)
2 shallots (slice thinly)
2 tsp Shao Xing wine (you can put more if you want)
Oil
Soy sauce
Steamer

Preparation:

1. Soak dried mushrooms to soften. Remove and chop. Reserve water for later use (Stock).
2. Soak dried shrimp in warm water for about 10 minutes. Drain. Add to the stock left from the mushrooms earlier.
3. Add some soy sauce to the stock for taste.
4. Peel the radish and shred with mandolin. Set aside.
5. Add about 1/2 cup of the stock to the flour. Stir vigorously. Add more water little by little until you get a very thick paste.
6. Fry shallot till a little translucent. Add shrimp. Fry till fragrant and shrimp turn darker shade. Add mushroom. Add Shao Xing wine. Add radish when mushroom starts to soften. Add remaining water. Fry till radish starts to sweat and softens. Turn off fire. Let it cool a little.
7. Pour radish mix into flour mix. Stir to mix thoroughly. It should be a runny consistency. If you find it too watery, stir in a bit more rice flour.
9. Grease your cake tin and pour the mix into it.
10. Steam for 20-30 minutes or till done.

For a more decadent snack. Cut into pieces after it cools and deep fry them.


Tip:
For those who have an air fryer, make this cake a little "softer" (wetter). If you run into problems because the final product after steaming is a little too soft, just let it cool to room temperature and pop it into the fridge (not freezer) to set. Cut into 2cm strips (think really thick fries) once it's firmer, coat with olive oil and fry them in the air fryer.

Sunday, January 29, 2012

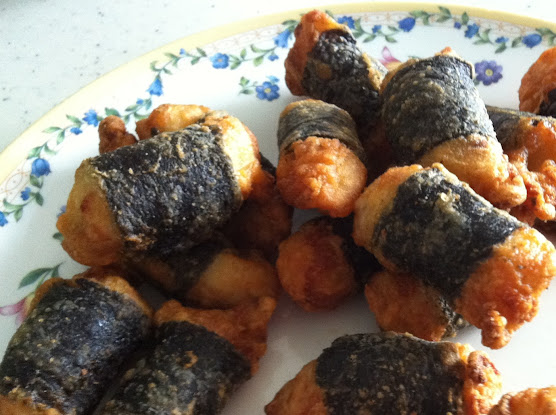
Airfried Seaweed Chicken


1. Set temperature at 200C and turn timer for 13 minutes.
2. Let Fryer preheat for 3 minutes. 
3. Pull the basket out, pour in your frozen bites. Pop it back in.
4. Let it fry for 4 - 5 minutes. Pull out, shake!
5. Let it fry for another 4 - 5 minutes. 
6. Check your bites in the last 2 minutes (in case yours are ready early!)

The result is a GOLDEN CRISPY snack that's yummy but not overwhelmed with grease.

Saturday, January 28, 2012

Philips Airfryer


I just bought a Philips Air Fryer yesterday and so far, I've been quite happy with what it is able to do. Experimented frying processed food: burger patties, crackers and seaweed chicken. The seaweed chicken turned out the best. The crackers were a little harder and dry - more like biscuits than keropok, but still very tasty. Burger patties turned out great as well.

Going by what I've heard from people and my little experiments, the air fryer is perfect for frying food that have some amount of fat in them inherently. (Think the chicken drumsticks, nuggets, etc)